Image Map

Friday, 23 October 2015

How to 'do' Halloween in Year 2...

Hey guys, so… if you caught my periscope this afternoon they you will know that my blogging mojo has gone missing! 

I've searched and I've struggled to find it but rather than just giving up I've decided to try and win it back! 

I've taken matters into my own hands and 'forced' myself to blog tonight! 
It is a perfect opportunity to link-up for Five for Friday  with my favourite- Doodle Bugs Teaching 

This week has all been about Halloween in my classroom! 

Even though I teach Year 2 (1st Grade) I still incorporate many areas of continuous provision more commonly found in Foundation Stage units and I am a firm believer that play is an integral part of children's development.
Whilst we have to get our half term assessments done, I always like to add in some fun too! 

 This week has proven to me just how right this approach is….

I have adored my role-play area and so have the children. I had hay-bales left over from our Farm Shop role-play so I decided to mix the 'rural' look with the Halloween theme and create a pumpkin patch! Visually, it WOWed but beyond that…. it excited! 
I split some pumpkins open using a rolling pin (very therapeutic) and let the children explore the pumpkin 'guts'- they developed their own ideas such as counting out the seeds and discovering which pumpkin had the most. 

The children also came out with great comparative language when pulling the pumpkin apart 
and it was great to be a part of.
'This piece is very rough compared to the slimy, stringy piece' said one little girl as she ripped off a piece of the pumpkin flesh!
 Messy hands, slimy pumpkin pieces and 6 year olds= fantastic! 

I also placed a lovely odd and even sorting activity made by the lovely Brittany of Tickled Pink in Primary who was my very first SLANT box partner! 

It was a great hit! 

Even though I knew there would be very little opportunity to do formal Literacy lessons this week, I wanted to look at instructional writing with the class as, although the children had produced 2 sets of instructions for BIGwrites, we hadn't formally looked at them. 

I wanted to capture the children's attention and create a sense of mystery about the lesson to fit with the Halloween theme. Sure, I could of dressed up as a witch and taught in role but I decided to use the magic of technology to hook the learning this time.

In order to set the week up and discover what the children knew about instructions already I used the 'Morfo' app to create a witch. 
You can get this app for free in the iTunes App Store 
She sent us a message asking for our help- apparently her potion wasn't working and she wasn't sure she had written her instructions correctly. We took a look at them and decided they were not a good set of instructions at all! Leading on from this, in groups the children produced 'What makes a good set of instructions?' thought showers and fed back their ideas to produce a class poster for our Working Wall. 

With the help of this poster we fixed the witches instructions and then followed them.

 This was the truly magical part! 
The instructions were simple- only 3 ingredients- corn flower, food colouring and water…. 
any guesses yet? 

Her instruction made oobleck!

 Each child got to explore the outcome and their puzzled yet fascinated faces made my day! 

I loved this lesson- it was simple, straightforward and engaging!
 All things a Monday morning lesson should be and as a bonus- I knew straight away that my kiddies are experts at instructional writing and I  didn't need to dedicate much teaching time to the features. 
Fab! 

I then added the remaining oobleck to the Pumpkin Patch in a pumpkin bucket so they could continue to explore it independently. 
This drew out even more descriptive and comparative language…
'I prefer this to the pumpkin' said one little boy…'prefer'…. I nearly fell off my chair!! 

Had I not provided this independent exploration opportunity then I would NEVER had guessed this particular little one had such a sophisticated word in his vocabulary! Sad but true! 

This week we had interviews for our new Head Teacher and as part of it my class were being taught by the candidates. 
As I knew my day would be disrupted I didn't want to get my teeth sunk too deeply into a new mathematical concept so I decided to build upon our 2 times tables practise and explore doubling and halving. 

We doubled numbers using pumpkin stickers on a mat I had made. I differentiated this activity easily using dice. As soon as I saw children were confident doubling numbers 1-6, I gave them a dice with 2 digit numbers on to try- quick, easy and effective! 
Some of my little ones are beyond using objects and are really comfortable using the partitioning method to add so I saw this as an opportunity to build on their place value knowledge and teach them how to apply it to doubling too!

I created a new resource which we loved! 'Frankie says…' contains halving statement cards- some of which are true and some are false. The children have to use an appropriate method, for many of mine it was still using objects, to discover which applied to their card and sort them. 

I bagged some bargain mini Frankenstine's head basket- 6 for £1- and the children used these to share their starting numbers between. 

I put all of these activities out during our independent learning time too- I love watching those who may have found an activity a stretch be supported by their friends in a fun and relaxed learning activity. 

As we had recapped the features of instructions I thought it was a perfect opportunity for the children to independently explore and apply their instructional writing skills in a play situation. 

I turned my writing and exploration areas into a Potions Lab- I provided the children with objects, coloured water, sand and glitter, a cauldron and writing prompts. It was a massive hit and lots of fun! 
We love Finger Gym in our school to develop fine and gross motor skills and pencil grips- our Potions Lab asked the children to pick up small objects and use circular motions to stir their mixtures- perfect Finger Gym enhancement!  

Even our daily Finger Gym sessions were given a spooktacular make over! 

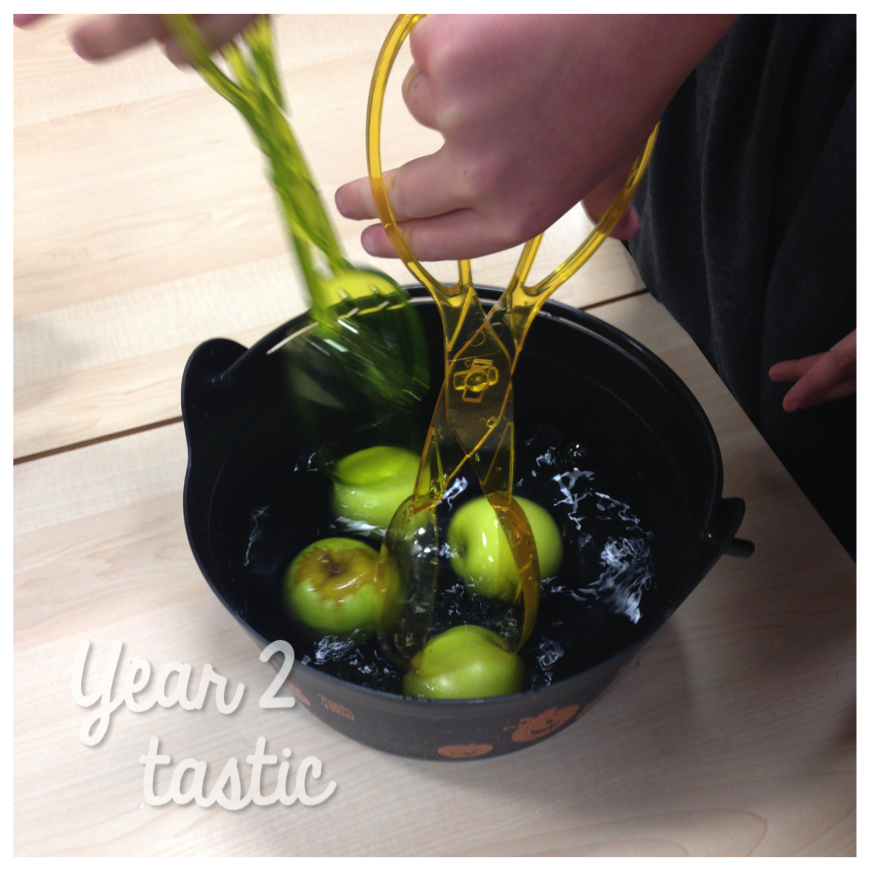
Apples and salad tongs…
 Picking up spooky table confetti and collecting in mini skeleton heads…
Using tweezers to remove spiders and ants from green jelly…
Adding and removing table confetti to create our own Halloween dough….
and combining our mathematical and fine motor skills to sort spiders with tweezers in the small world! 

It has been lots of fun in school this week- all topped off with spooky snacks, creepy costumes and ghoulish dancing! 

Take a look at our Halloween decorations…
How has your week been? 
Awesome I hope!

Monday, 5 October 2015

Currently…October

WOW!!! I cannot believe I haven't posted for a month!!! My poor little blog! I'm so sorry! 

Settling back into the school routine has taken time and I think I am almost there…almost! 

So…what better way to get back my blogging mojo than linking up with the lovely Farley over at Oh Boy Forth Grade for the latest currently!

I cannot believe it is the final season of Downton! What will I do with my Sunday nights? Boo!

Woohoo- PSL's are back on the menu… can I get an Amen?! 
I've also just invested in my very first autumnal decoration and I am in love…. don't worry… more are on their way!

Yes I know…I've not blogged for a month!!! I'm sorry for being rubbish but I've just been so worn out and I've had no space in my brain for blogging but it is all about to change-I promise!

Hands up- who loves wooly hats?! Me, me, me, me and I can't wait to go shopping for my newest addition to my collection- I'm thinking a mustard bobble hat! 

With the new house came real fires and seeing as the downstairs isn't double glazed, I'm thinking we are going to be needing the roaring fire to keep us toasty when the cold nights set in!

Autumn leaves are just boo-tiful! I would love to visit New England in the fall but seeing as we only get a week off in October, I think it's safe to say that dream will be a while off! 

Wishing you all a lovely October and I promise you will be hearing more from me soon!

Wednesday, 2 September 2015

Classroom Reveal 2015


Well… it's finally here… tomorrow is my first day back at school. We have 2 days of training and then the kiddies come in on Monday. I'll be honest, I never feel 100% ready… I'm always more about 85% but thats's ok, right? 

So before the madness and tiredness of back to school hits I'm linking up with the lovely Ashley and Angie for this month's #2getherwearebetter link up and the wonderful girls of Blog hoppin' for the very first time as part of their Teacher Week! 


#realtalk alert
This is really only a part classroom reveal! 
Seeing as I have 2 days of in-school training (INSET) left then I still have things I want to tweak and tidy before my new little friends come in on Monday so I've taken pictures of the areas I am happy with.
Don't worry….I'll be updating my 'Classroom' page over the weekend with my full- on 2015-2016 classroom!

So…

I have a small board right outside of my classroom where the children's lockers are and I like to use it as my welcome board.
I loved last year's board soooo much that I knew it was going to be hard to beat. 
I like to mix up my backing paper and I think splattering it with paint looks so effective. 
I agonised over what text to put on the board and how to arrange it for ages but now that I've got it up I'm pretty happy (even though I can spot where it needs straightening out!) 
I used oversized KG and Hello Literacy fonts to make it pop!(thanks for the idea Ashley!)
The HUGE crayons just add that WOW I so love!
I love all things Glitter Meets Glue and Amie's glitter art supplies set looks amazing with the children's names on around my board. I'm also loving my Tallahassee Sunday pencil- I snagged it in a give away and I couldn't be happier!  

Let's go through the door!!! 
I have 2 parts to my classroom- the small entrance we call The Den has my sink area as well as a large set of shelves and it's where I have my library and small group area. 

When you walk in the first thing you see is my reading display- I decided that I would keep the same one up from last year seeing as it still match everything and it had no work from the children on it- 
To the left of my reading display board I have my library books and CAFE board…
I like to have my kiddos put their peg onto the ribbon to set their targets.

This area has cushions and book buddies so that the little ones can choose a book, curl up and read to themselves, a book buddy or a friend. When the big light is off and the lamps and fairy lights are twinkling away it's magical!

To the left of my CAFE board are the huge set of shelves!!! 
For the past 3 years they have had a curtain across them but this year I finally plucked up the courage to tackle them!!! 
Other than putting some labels onto the big plastic boxes and writing on the little chalkboard tags attached to my book baskets, I'm pretty much done with this area and I couldn't be happier!
Just beneath the big selves is a really cute set of pink cubbies from Ikea which I keep my Phonics resources in. There is also a comfy teacher chair, display board (yet to be backed) and a wall mounted whiteboard so this area is perfect for small group work especially because I can close the door into the classroom and it's nice and quiet! 

Straight opposite the big shelves, to the right of my main door is my sink area-
I have the wonderful Rachel Archer  of Archer's All Stars and her Periscope to thank for the amazing hessian ruffle boarder! I adore it!!! 
This board will have ribbon draped across it and I will peg up artwork during the course of the year but it's blank for now because on the first day back I like to do a 'Recipe for Success' activity from Educating Abroad which I will peg up here for a week or so.
I also kept my 'What's The Crack?' parent's board up from last year as I only changed it in January and I still love it! 

I spent some time yesterday getting this area ready for the first day back-
I'll put the morning activity or any letters to go out to parents onto the clipboard and children can put finished books which need changing into the basket. 
We use Accelerated Reader at our school so the small chalkboard sign will say 'Don't forget your peg' to remind the children who have returned a book to move their peg onto the 'I'm ready to take a quiz' poster. 

So…let's wave goodbye to 'The Den' area and 
step into my classroom! 

This is the area that I'm still tweaking so I've only included a few pictures for you today!

As you come into the room over on the right wall you are greeted by the boards I use the most.
My main boards aren't really boards!!! The paper is stapled straight into the plaster board!! 

I simply didn't have enough useable board space and so I spoke to my head when I first moved into the room 3 years ago and asked if this would be ok seeing as it would be a few small staple marks rather than lots of spots where the sticky tack had pulled paint off and, seeing as this was way cheeper than buying board, she kindly agreed! Yay!!!
 These boards are my Working Walls so their content gets changed almost fortnightly to match our current text type and Numeracy strand. The children have full access to these boards and often stick things on them or respond to questions. 
I snagged the whiteboard in the cute frame from The Range, it's also magnetic and will make a perfect place for me to pose maths problems and have the kiddos work them out. 
The shelving unit you can see the top of houses all of my manipulative, number lines and maths games so that the children can access them easily. 

To the right of my Working Wall is a new area this year. It used to be where my old and tired computers were and the board had our Learning Challenge questions on it. This meant that the board HAD to be changed EVERY half term and had things getting put up on it every week! Lots of work!!! Since I have another board in my role play area which I can use that as my main Learning Challenge board (I'll give you a sneak peak of that next week!) I've decided to make this one my Bucket Fillers board and I adore it!!!! 
I snagged the gorgeous posters for free from the amazing Miss May over at One Fab Teacher!
Seeing as this board will stay the same all year it will totally help me in my bid to work smarter not harder - something I really need to do!
Beneath the board is a set of shelves from Ikea- like the ones in The Den with 4 cubbies but long and thin instead. In each cubbie is a box with construction equipment in it and on top are 4 baskets with the children's work books in them. 

Here are a few small details from my classroom that I'm ready to share with you…
My marking holders currently hold the baseline assessments we need to do when we get back to school  seeing as I have no marking at the minute (whoohoo!) I also need to update my 'It doesn't get much better than this!' frame with a picture of my new class but seeing as they aren't in until next week then I'll just keep looking at my little cuties from last year for now as I hate empty frames!

How adorable are these cork boards from Wilkinson's?! 
We'll pin new vocabulary we find in our text up on them so that we can use it in our own writing.

And finally….I spent sometime yesterday adding these cute ribbons to my working walls! Why? No reason…they just look adorable and I looooove the heart push pins! 

I can't wait to get back to school now and add all of my finishing touches! 
Be sure to head back and check out my 'Classroom' page next week for a full classroom reveal!!! 

Don't forget to hop over to the other wonderful teachers in the #2getherwearebetter and Blog Hoppin' link-ups! 

Have a wonderful back to school guys


Saturday, 15 August 2015

6 signs you're a totally 'Basic' teacher just like me!

So…. I've been reading a lot of negative press about being 'Basic' lately and I'm like….that is so me and I don't care one little bit….in fact more than that…. I'm proud to be a 'Basic B*tch'
I adore Clueless and SATC, I use words like 'Totes' and count down the days until a PSL is back on the Starbucks menu and you can bet I'll be Instagramming a picture of it!

I'm not doing any of these things to be anything other than me and I feel that if I didn't do them then I'd be trying to be one of those cool, nonchalant, espresso drinkers who write the memes and blogs about 'Basic B*tches' and that would just be totes fake!

But this got me thinking… is there such a thing as a 'Basic' teacher and am I one? 
The answer to both of these questions is YES and YES!!!! 

Keep reading to see if you're a 'Basic' teacher and if you are- BE PROUD!!!

1
You post a picture of your latest classroom bulletin board and are secretly excited every time someone likes it- it kind of reaffirms the reason you got into teaching in the first place….to make things pretty! Duh! 

2
You have a love affair with all things Erin Condren and obsess over which cover to get. Add 'Basic' points if you post a pic of the box once its arrived!

3
You fill your wish list with about 1000 amazing products in anticipation of the next great TpT sale only to have to sit the night before excruciatingly taking things out of it because you know spending THAT much money would just be ludicrous…wouldn't it?

4
You have stars in your eyes for the likes of Mr Greg (The Kindergarten Smorgasboard), Aly (Just a Primary Girl) and Meg (A New Box of Crayons) and your little butterflies do a leap every time you see one of them in your 'Scope or 'liking' a tweet of yours. I mean….they are the Ryan Gosling, Jennifer Lawrence and Cameron Diaz (only mucho cooler) of the teaching world right?!

5
You have commented that Pinterest/Periscope/ Blab/IG is the best thing to ever occur in the world of teachers- they should totally earn you CPD credits or something right…I mean, the hours we put into them!!!! 
6
You turn your nose up at Comic Sans (but in a nice way of course) and can name a KG font from 50 yards!

If you could say YES to at least 3 of these then welcome to the wonderful world of  the 'Basic' teacher!
5 or 6…. we need to Blab right now- let's be blogging besties and totally have each other's backs- you are my kindred spirit! 

No offence is meant with this post- I can say a huge HELL YEAH to EVERY.SINGLE.ONE of the above statements and I am totes serious about the whole blogging bestie thing- email me year2tastic@gmail.com
I'm a #basicteacher and PROUD!

(All pictures used are my own year2tastic IG ones!) 

Monday, 3 August 2015

Colourful Comprehension Strategy


Hey guys how are you?
So… I just love teaching reading- I love getting to unlock the world for my littlies don't you? 
It's such a privilege!

Guided Reading and Phonics are my jam but I hate watching my little darlings struggle away when it comes to doing a comprehension test.

My children are great at having a discussion about a text- pulling out how the character feels, reading between the lines and making predictions but doing this in a test all on their lonesome…not so great! Anyone else?

I got to thinking about an approach I could use to help bridge the gap from discussion to test and came up with 'Colourful Comprehension'. We love highlighters in our school and by attaching a colour to a key language element it provided a clear mnemonic for the children to use. 

My children are 6 & 7 but I am confident that this is a strategy which will be useful for much older children too! 

The strategy is taught during small group/ guided reading sessions but is easily applied when the children are flying solo.
The first in the series applies the strategy to texts where children have to determine the author's opinion such as in a review or report. 

Step 1
Using examples of report text, discuss the language features most commonly associated with them and make a note. This could take a whole session.

Step 2
Introduce the colours- 
Discuss from the previous step the kinds of language they might consider positive, negative or a modal connective.

Step 3
Share the language charts with the children. You could do Step 2 and 3 in one session or you may prefer to split them up. You could even go so far as splitting each language type up into 3 separate sessions- it is totally flexible so you can go with what your children need. 
                      

Step 4
The next step is to find each type of word or phrase within a report/ opinion text and highlight them in the correct colour. Demonstrate to the children how to scan for those modal connectives so that straight away they are aware if the author has a change of opinion or offers more than one. Once this is done  then you can demonstrate how to tally up the number of positive and negative words which will then provide an indication of the author's voice in the text. 
Included in the pack is a fully modelled colour sheet, a black and white completed sheet, a black and white sheet ready to be completed and a black and white sheet ready to add your own text to.
 
Step 5
Once all of the highlighting and tallying is done then it is time to write the summary. I do this orally first and then give the children a small, square post-it note so that they have to keep the summary succinct and include only the key points. I guide my children to mention the points raised by the modal connective as this will show that they have understood if there is a mixed or alternative opinion within the text. 
Space is provided on the format to then write the summary but this is an optional step and is not integral to the strategy but is good practise. 

Finally… 
After using this strategy several times or until you feel the children are comfortable with it, give them an opinion text in it's 'real' layout, provide highlighters and let the children apply the strategy to the text. On the first go at a 'real' text my children were fantastic but some did ask 'Is it ok to tally?' because space wasn't explicitly provided for it and this is where a practise on a real text or 2 during a guided session is invaluable before a test situation occurs. 

The pack contains black and white versions of every sheet so that you can choose your own highlighter colours and also be ink-friendly! 

If you think this would be useful in your classroom then please click here to head to my TpT store.
Spellings are American-English within this pack but a UK English version will be available too.

Coming soon…Colourful Comprehension: Fact or Opinion? 

Thanks for stopping by- feel free to leave me a question in the comments...


Sunday, 2 August 2015

All Things Bulletin Boards: The UK Way!

Yay! It's time to link-up with Angie and Ashley
I absolutely adore these 2 lovely ladies! Their friendship and journey has truly inspired me- if you haven't caught one of their periscopes yet then I strongly suggest you do! They have take the whole #2getherwearebetter thing to a totally new level let me tell you! 


So….this month we are coming together to talk about one of my most favourite subjects 'bulletin boards' or 'displays' as we would call them in the UK. Now, I know in the UK there are some guidelines regarding workload which suggest that teachers shouldn't do displays but if you're anything like me then displays are THEE main reasons you became a teacher in the first place!!! 
Just kidding…….no seriously! 

So….the bread and butter of a board is the backing and boarder. 
Both are equally important for pulling your classroom theme together and drawing attention to learning opportunities.

The serious stuff- laying a good foundation!
Most board resources here in the UK are a whole school resource so we don't often have a
big say in the colours and patterns available.
Our paper is stored in a central store and it goes very quickly! We mainly have sheets of display paper which is fine with me as they are easier to put up on your own. 
I get anxious if paper isn't straight, I hate when people cut strips to fit rather than arranging the paper correctly, I hate too many staples and I can't stand when people use too many sheets!! Most boards in my classroom take a combination of 2 or 3 landscape pieces on the top and 4 or 5 portrait pieces at the bottom NO MORE, NO LESS!!! This gives the crispest look to the board without waste or cutting pieces- a minimal overlap of about 2cm is more than enough!!!
Rolls of backing paper? I HATE THEM! They are so hard to put up solo and I always, always get a 'sag'- you know what I mean?
See…I'm a serious board backer!!! I think it comes from years of covering boards in my mother's classrooms. She was trained in the 1960's when they actually gave trainee teachers lessons in this stuff and I suppose it's just stuck!

Framing the master piece- Boarders
Again the boarders tend to be a whole school resource here in the UK and in our school, layering the nice ones up isn't really an option as we don't have loads available and have to be mindful of other teachers and their needs.
I love to use corrugated boarders as they handle easily and seem more hardwearing but they don't often come in fancy designs. I love boarders which add something to the display as well as framing it. I've often made a boarder up of the children's artwork for example we collaged cardboard penguins and used them on our Polar Regions display as the boarder. Once I cut long strips of card and got the children to choose shades of green and splat the card with it to frame a display on frogs. 

The 2 types of boards in my room and lots of other UK classrooms
O.K. so… not every board can be cute some just need to be practical. 
We have the more time consuming and appealing 'Display Boards' and the quick and easy 'Working Walls' in our room. Both are absolutely worth while and valuable. 
Here's the difference…

Display Boards- These are used to display the children's work or information which will be up for a while.They should be engaging and encourage the viewer to look closely. We want the children to feel a sense of pride in their work and environment so putting time and effort into the way we display it should reflect this.

Working Walls- These are the boards the children refer to constantly for their learning. They are not just a background wall paper but should be changed and adjusted to reflect the children's learning and the unit/ topic that week/ term. They don't have to be cute as they are meant to be used not just looked at. That doesn't mean to say that pride shouldn't be taken in them but that they should be user friendly. 
 
                                         
Some of my favourite things!
If you have read any of my previous TGIF posts then you will know that I love to use photo frames and wall paper in my classroom. School can be a daunting place for the children and parents alike so I think using 'home' items around the room brings a sense of the familiar and helps them to relax.

This is one of my all-time favourite displays to share information with parents-
Parents even bring me old rolls of wall paper into class now too! Such an easy way to connect!

I love making the backing of a board a little bit different- I know using fabric is big in the US but not so much here in the UK although I have been known to use some burlap to back a board before!

I love how splatting paint on the paper before backing the board can look-
Sure the kids look cute in their spacesuits but its the paper I'm interested in! Using white splats on black made our space display pop and this year I'm using some of Glitter Meets Glue's sparkly clip art on a colourfully splatted lilac backing paper to make my 'We're a Colourful Class' welcome board stand out!

This simple 'Finger Gym' board used for tracking grip development is simply a strip of brown paper- I'm yet to put the lettering on the burlap- oops!
Wrapping paper makes a great backing provided it doesn't distract from the display content. 

I also don't like to keep my displays to just the boards- I don't have many so I branch out wherever possible!
Washing lines and vertical blinds are brilliant places to peg work for display.

My overall goal with bulletin/display boards is to present either work or information in a creative and interesting way but I believe you have to strike a balance. If the backing or boarder is too fussy then the content of the display can become lost. Our little ones find it hard enough to focus and concentrate at the best of times!

The background and boarder should simply frame and present the work not distract from it.
All jazz and no pizzaz makes a very sad board indeed!

Popular Posts

L. Paull Designs for All
Blog Design by L. Paull Designs for AllFonts by KGFonts